How to View Your DVR/NVR Footage on Your PC
How to View Your DVR/NVR Footage on Your PC – A Step-by-Step Guide from Nikitis Tech Hub
One of the most common questions I get as a CCTV expert is:
“How can I watch my DVR or NVR camera footage on my laptop or desktop PC?”
Whether you’re using HIKVISION, Dahua, UNV, or even a generic DVR/NVR brand, the steps are quite similar.
In this Nikitis Tech Hub post, I’ll show you how to connect and view your CCTV recordings on a computer — locally or remotely.
What You Need Before You Start
Make sure you have:
-
✅ A working DVR/NVR system connected to cameras
-
✅ A network cable (LAN) to connect the DVR/NVR to your router
-
✅ A PC or laptop connected to the same network (or internet)
-
✅ The CMS or VMS software (provided by the brand)
-
✅ The DVR/NVR's IP address, username, and password
Step 1: Connect DVR/NVR to Your Router

-
Plug one end of the LAN cable into the DVR/NVR.
-
Plug the other end into your Wi-Fi router or switch.
-
Ensure the DVR/NVR shows a network icon or IP address in the settings.
🖥️ Step 2: Install the Monitoring Software on Your PC

Here’s a quick guide based on brand:
| Brand | Software to Install |
|---|---|
| HIKVISION | iVMS-4200 or SADP Tool |
| Dahua | SmartPSS |
| UNV | EZStation |
| Generic DVRs | CMS Client (often on CD or vendor’s site) |
💡 Wisdom's Tip: Always download software from the official website to avoid malware.
🌐 Step 3: Add Your DVR/NVR to the Software
If You’re on the Same Network (Local Viewing):
-
Open the software.
-
Click Device Management or Add Device.
-
Choose IP/Domain mode.
-
Enter:
-
IP address of DVR/NVR (e.g., 192.168.0.120)
-
Port number (usually 8000 or 37777)
-
Username & Password
-
-
Save and test connection.
If You’re Away (Remote Viewing):
-
Use the Cloud ID / P2P ID (found in the DVR settings).
-
In the software, go to:
-
Add Device > P2P/Serial Number
-
-
Input:
-
Cloud ID
-
Username & Password
-
-
You may need to enable P2P or DDNS from the DVR’s network settings first.
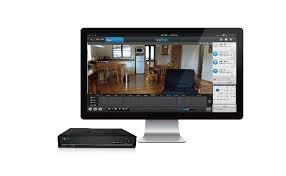
Step 4: View Live Footage or Playback

Once connected, you can:
-
✅ Watch live camera feeds
-
✅ Access recordings (playback) from any date/time
-
✅ Take snapshots or video clips
-
✅ Adjust resolution or stream quality
📌 Some apps allow exporting footage directly to your PC for evidence or backup.
Troubleshooting Tips
-
❌ Can't detect IP address?
-
Use SADP Tool (HIK) or ConfigTool (Dahua) to find it.
-
-
❌ Login failed?
-
Reset the password physically or via security questions.
-
-
❌ No image showing?
-
Check port numbers or firewall settings.
-
-
❌ Remote view not working?
-
Make sure internet is active and P2P is enabled in DVR.
-
Wisdom's Final Words
Accessing your CCTV from a PC gives you more control and is ideal for:
-
Office security rooms
-
Viewing multiple sites on one screen
-
Backing up footage for police reports
At Nikitis Tech Hub, I help clients set this up both remotely and on-site. If you need:
-
📲 One-on-one setup help
-
🔧 Password recovery
-
📡 Network-based remote view configuration
👉 Reach out on Telegram: @NikitisTechHub
🎥 Follow us on YouTube & Facebook for video tutorials


Comments
Post a Comment